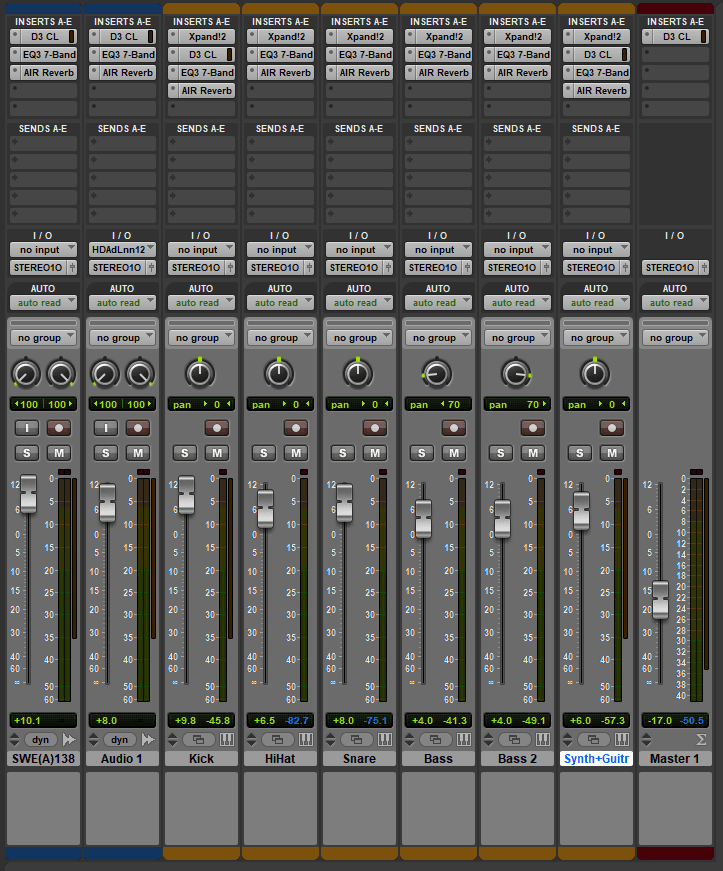
With the sounds selected from the Xpand!2 plugin and the initial sequencing elements done, it was time to mix and master all of the tracks.

Wandering Eye Dance Remix – The volumes, panning and plugins
In regards to the mixing for this song, I raised all of the levels across the board to raise the initial volumes of the tracks, before lowering it on the master fader on the right. This was done to make all of the instruments louder initially, balancing the tracks accordingly at that higher volume before lowering the volume of all of them on the master fader, and this was done to make the mixing a little easier to manage for the mastering stage, only needing to raise or lower the master fade if all the tracks needed a volume boost/reduction. In regards to the panning, I panned the bass synths to the left and right, as well as panning the audio on the stereo vocal tracks to the far left and right to give a bigger sense of space on the track, hoping to avoid cluttering the center with too much noise.
In the mastering process, I began with applying a compressor, an equalizer (EQ), and reverb to the vocal tracks, in order to adjust the dynamic range (the compressor) and the frequency levels (the EQ) of the vocals, as well as simulate an environment where the vocals are being sung (the reverb). Initially there had been only one vocal track, but I split it up during the editing process and placed some parts onto the second track (the one called Audio 1). This track was to be the radio effect that had been placed on the vocals during the first verse, which I recreated using the EQ for a part of the second verse I had split from the rest of the song (when the lead singer says “the way I do about you”) as well as at the end of the song when he is talking about ways to stop the female vocalists wandering eye. I did this by lowering all the frequencies in the EQ, except for the frequencies around 2.64 kilohertz (kHz) which I raised, giving the audio a radio-like sound. To improve it, I applied a compressor on some of the higher frequencies prior to applying the EQ, which helped to improve the volume of the track, before applying a small amount of reverb to it to make it fill more of the auditory space.
The compressor and reverb were also used on the main vocal track in the same way, but the way the EQ was used was a little different. Instead of a radio effect, like on the second vocal track, I boosted the frequencies at 5 kHz. This effect helped to make the vocals easier to understand because the increase of the higher frequencies added extra presence to the words that were sung, improving their clarity and helping to stop the vocals from getting lost under all the other instruments.
The hi-hat and snare drums both received boosts at around 4.5 and 5.5 kHz respectively, boosting their higher frequencies to help them sound crisp and clear. Similarly to the vocals, they needed this boost to help them stand out and not be buried underneath the synths because they had too much emphasis on the lower frequencies without the EQ.
I followed this by applying a compressor onto the kick drum, to reduce the dynamic range (“the ratio of the softest sound to the loudest sound”) and boost the volume of the lower frequencies, which I then boosted slightly further with help from the EQ, with some slight reductions from 300 hertz (Hz) to 3 kHz. The intended effect was to give the kick more of a deep ‘boom’ sound, because it helped the kick have more of an impact when coupled with the bass synths. This was also helped by the usage of reverb, because it allowed the sound to become ‘wet’ (where the output sound is affected by the reverb), and, similarly to the vocals, it allowed it to fill more of the empty space in the audio.
The reverb was the same for every single instrument and vocal on this song, as I wanted a consistent sound that wasn’t hindered by one instrument/vocal that didn’t have a reverb, compared to the others that did. On the subject of things being the same, the EQ on both of the bass synths was the same too, adding extra volume to the frequencies around 70 Hz to boost their existence in that range.
The synth-guitar track needed that extra level of presence in the track due to its melodic nature, so I used a compressor to reduce the dynamic range of the sound to boost the lower frequencies to a similar volume level as the higher frequencies, followed by boosting the frequencies at around 3.5 kHz on the EQ to add presence to the track, and then finally the reverb to keep the sound of the synth consistent with the rest of the track. I chose to do all of this because I wanted a loud, harsh guitar-like synth that could stand out on the choruses, but could also help support the vocals when it came to the verses, and I believe the way I mastered the track allowed the synth to perform that role perfectly.
And finally, the master track received a very light compression which slightly reduced the higher frequencies and louder noises from all of the tracks, further helping to get a consistent volume level throughout the song. This was used as a general compression for all of the tracks because I felt that the song had too many opportunities to be too loud or too quiet around the start and end, and I wanted to make sure the volume remained at a constant level despite the changing intensities from the use of velocity on the sounds. This was done because I did not want to have a part in the song that was suddenly louder than the others, which could potentially add unneeded distortion to the song form being too loud, which would be both horrible to listen to and equal to an unprofessional mixing/mastering quality.
The song, prior to the mixing/mastering stage, sounded like this:
The song now sounds like this:

Leave a Reply