George Walker's Audio Project 2 Resit

Just another University of Lincoln Coursework Sites site

Category: Mastering

Mixing and Mastering – Levels Dance Remix

Levels Dance Remix – The volumes, panning and plugins

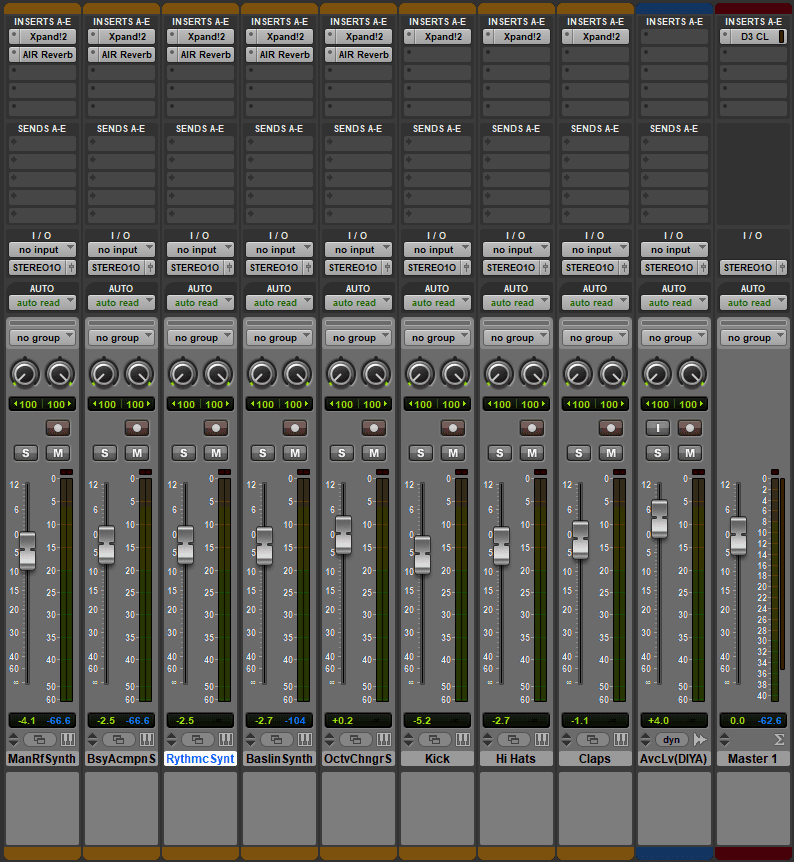
The mixing for this track sees the main riff synth and kick drum being the lowered slightly, due to the sounds on those tracks being generally louder than the others. Regardless of this, though, most of the tracks have been lowered slightly to place focus on the vocals and the Octave Changer Synth, which have had their volume increased to bring them forward in the mix for their respective parts. This is because the synth sound I selected on the Xpand!2 plugin was quieter compared to the others (the opposite problem to the kick and main riff) and needed a very slight boost in volume to prevent it from being lost in the mix. The vocals needed it too, because they were one of the most important aspects of this remix (they were featured in the original song too), and it helped to give the lyrics some clarity, being able to be heard regardless of the other sounds in the background. In addition, all of the tracks, which were stereo tracks, were panned to the far left and right simultaneously to help the mix sound wider (where it covers more empty space in the stereo mix), because this achieved the same effect as if the panning was right in the center, but had the additional feeling of almost encircling the listener on the speakers, playing sound all around, like a surround sound system.

There wasn’t much to be done when it came to the mastering stage, as I liked the sounds as they were. This was because it felt quite robotic to listen to (which was the intended effect), but this was offset by the vocals, which brought life into the track and rose above the synths, similar to how most female vocals “float above the synths” in Trance songs. This was also helped by the use of reverb on all of the synths, which helped to make the sound slightly more ‘wet’ (where the effect is heard on the output sound, compared to the ‘dry’ input sound where no effect is heard), because it allowed the synths to fill the same space with their sound, thus providing a nice back up sound underneath the vocals.

I would have also added some plugins onto the vocals, but I chose not to because I wanted to pay homage to Avicii, who unfortunately passed away earlier this year, by keeping the vocals exactly as they were in the original song (the original vocals came with reverb and delay already programmed into them so I didn’t need to add the plugins). The reason for this was because Avicii was an idol of mine when I was younger, and even now I still enjoy his works. I felt that keeping the vocals as close as possible to the original ones was a good way to pay tribute to an artist I enjoyed.

And lastly, I applied a compressor onto the master track to have a soft reduction to the dynamic frequency, as well as a reduction in the volume of the song. This was done as the song felt slightly too loud, which meant I had to use the compressor on the master fader to control how loud the song needed to be (in this case I reduced the sound slightly as I didn’t want it to sound too intense). I chose not to use the EQ plugin on any of the tracks for this particular song because I preferred the sounds I had chosen already, and felt that I didn’t need to change any frequencies in order to improve the sound quality. Furthermore, the compressor on the master fader did the purpose I would have used the EQ for across all of the tracks, reducing the dynamic frequency range to get rid of the highest and lowest frequencies to clean up the sound.

The song, prior to the mixing/mastering stage, sounded like this:

The song now sounds like this:

Mixing and Mastering – Dropz

Dropz – The volumes, panning and plugins

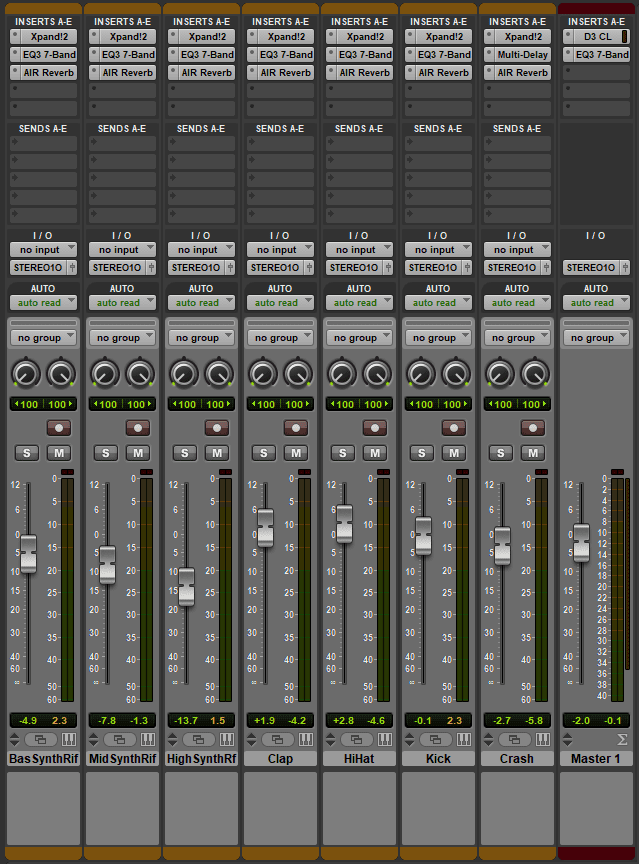
While the High Synth track was the melodic riff of the whole song, I felt that it didn’t need as much focus because of the fact that this was a dance track which focused less on the higher pitched melodies and riffs. I wanted the focus to be on the bass synths and the drum kit, which made me lower the volume of the synth riffs more than the others, while the drums remained between 0 and -3 decibels. However, the HiHat and Clap tracks both gained volume as, in the second main section of the song, I felt that they got buried underneath the mix and were hard to hear among the other instruments, so I gave them a volume boost to compensate for this without making them too loud in the rest of the song.

When it came to the mastering for the tracks, I understood that each track needed their own EQ to bring them to a more professional standard of sound, and played to each of the tracks strengths to enhance the overall quality. To do this, I examined each of the tracks and increased frequencies that I felt would improve clarity, while decreasing the frequencies that would make the sounds mesh together into a jumbled mess. For example: For the initial bass riff, I not only increased the bass frequencies under 100 Hz, as well as the frequencies above 2 kHz, but I reduced the upper bass/lower midrange frequencies around 200-400 Hz, to help open up the bass sound slightly and give it some clarity.

In addition, the clap and hi hat tracks received a boost at around 4.5-5 kHz, making the sounds clearer and crisper. This was important because of the heavy usage of the middle and lower frequencies in the song from all of the synths, which could have easily drowned out these two tracks if they had been mastered poorly. But, thanks to the boosting of the higher frequencies, these sounds stood out and were clear enough to not be buried under the barrage of sound from the synths.

Speaking of the synths, the Mid Synth Riff track, the one used for the drop, received a big boost to the frequencies at 200 Hz, which gave the sound a bit more of an “oomph” which helped the song to sound much heavier. Meanwhile, the High Synth Riff got a boost at around 3.5 kHz, allowing it to occupy more of the higher frequencies alongside the hi-hat and claps. The reason for this was because, with all of the other EQs on the other tracks, it muffled the synth and made it impossible to hear in the mix. Thankfully, boosting around these frequencies gave it more clarity and boosted the volume of the notes slightly, which helped it to remain in the mix without being overbearing.

The last instrument to receive the mastering was the kick drum. The original sound for the kick drum felt too hollow, so I applied a gentle boost to the frequencies between 20 and 100 Hz while reducing the other frequencies a little more. This way, I was able to give the kick drum a more ‘boom’ kind of sound (where the lowest bass frequencies are raised to give power to a synth/instrument), which was needed because none of the other drum parts received boosts in that area, and it allowed the kick to have more of an impact on the song, keeping the rhythm audible for the listener.

Each of the instrument tracks also gained a reverb plugin to simulate a small-room environment, which is barely audible on the track but still enough to be noticed on the drops. The reason for this was because I didn’t want to apply a reverb that was too much, and cause the song to be a mess of constant reverb and echo (I didn’t want it to sound like it was recorded in a church or a stadium!), instead opting more for a softer adjustment for a subtle change in the sound.

Finally, I applied a compressor and another EQ onto the master fader to control the dynamic frequency range and remove any unwanted frequencies from the mix. With the compressor, I chose to limit it at a 20.0:1 ratio with a threshold of -5 dBs, which means that any sound louder than -5 dBs would have the compression applied, and the input signal will have to cross the threshold by 20 dBs for the output level to increase by 1dB. Essentially this equated to a gentle limit that reduced the output volume slightly while reducing the frequency range, which was perfect because it reduced any sounds that were too loud and made sure the frequencies I didn’t need around the highest/lowest ends were cut out, or at least reduced, to clean up the track. I used the EQ to remove some of the frequencies below 100 Hz as well, as I wanted to make sure the sound was clear and not cluttered with inaudible frequencies.

The song, prior to the mixing/mastering stage, sounded like this:

The song now sounds like this:
Mixing and Mastering – Frantic Dance

Frantic Dance – The volumes, panning and plugins

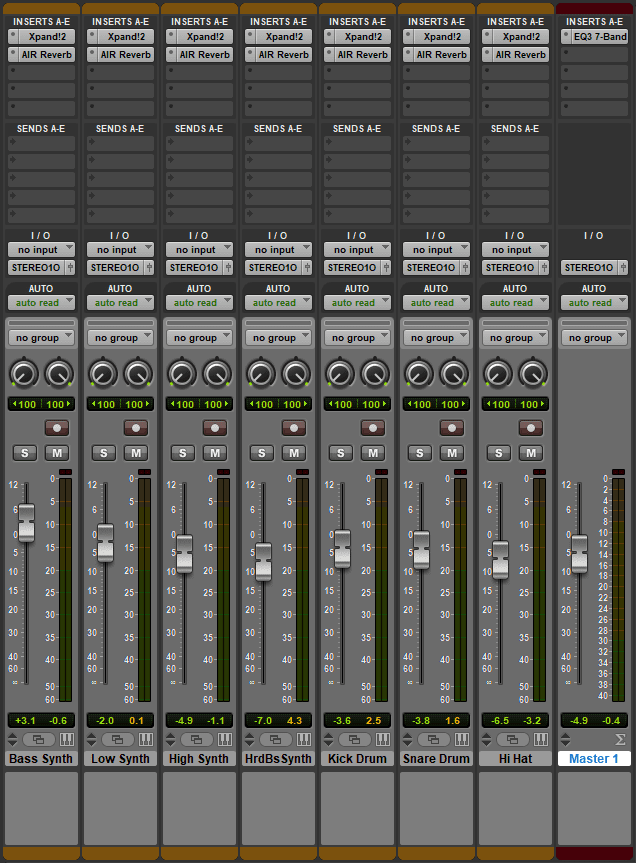
The mixing stage was very simple for this song, as all I needed to do was increase the volume for the main bass riff and reduce the volumes of the other synths accordingly. The low and high synths were the same riff on different octaves, and I reduced the high synth more than the low one because the higher frequencies stuck out quite a lot in the mix, and I wanted the focus to be on the lower frequencies of the sounds, but with varying volumes throughout the bass synths to avoid making the track sound muddy and cluttered with sounds at the same frequency.

In regards to the mastering of the song, I found that there was very little to do to help improve the song beyond what it already sounded like, although I believe the choices of plugins did help to create a song I’m genuinely happy with. Each of the drums and synths received a reverb plugin (a plugin which simulates space), which was adjusted to make the song sound like it was played in a small-to-medium-sized room, with enough reverb to make the effect audible but not enough as to drown the song in constant reverb. This was done because it allowed each of the instruments to feel like they were producing their sounds in the same room, thus giving the sound some consistency across the multiple synths and make the timbre sound fuller (where it covers more of the frequency range).

However, as I quickly discovered, there were some frequencies I didn’t want in the song, as it made the song sound slightly too muddy for my liking. This was where the master track came in – I applied an EQ onto it, which I then used to reduce the low-end frequencies (from 100 Hz downwards) to remove some of the lowest sounds which weren’t completely audible to the human ear (they can hear from 20 Hz – 20,000 Hz), but were still enough to make the song sound too ‘boomy’ (where the lowest frequencies are raised higher to make the bass sound excessive). Cutting these areas added some clarity to the bass sounds (as described here) which was important because I didn’t want the song to be a cluttered mess of muddy sounds all conflicting with one another, as that would make the song sound much worse than intended.

The song, prior to the mixing/mastering stage, sounded like this:

The song now sounds like this:
Mixing and Mastering – Number 2

Number 2 – The volumes, panning and plugins

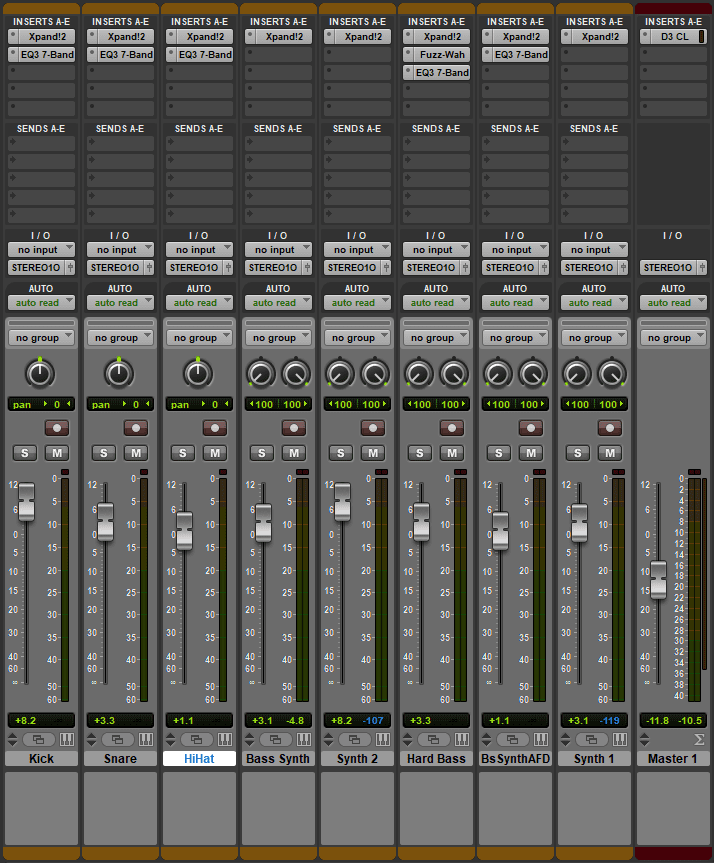
The mixing for Number 2 involved a simple rise to all the volumes of the synths across the board, with the kick drum and “Synth 2” (a lead synth with octave changing notes) receiving the highest boost while the other synths, while also boosted, did not receive as big of a volume boost. The reason this was done was to raise the loudness of the kick drum and synth in particular, but also to make the track as loud as possible without distorting the sound, to allow the drop in the middle of the song to have a bigger impact when it hit, as well as helping the rhythm of the song to be easily heard over the other instruments.

It also helped when it came to the mastering stage because I used a compressor on the master track to reduce the dynamic range slightly across all the tracks, which allowed the lower frequency sounds to increase in volume a little further. This was done to give the bass sounds, as well as the kick, a more ‘full’ timbre, so the sound felt much bigger than it was before and kept the emphasis upon them instead of the higher frequency synths, which were less important to keeping the rhythm.

The EQ I added on the kick drum gave it a much needed boost in the higher frequencies. At 4kHz, I added 6 dBs of gain to the EQ, which helped to give the kick drum some clarity underneath the rest of the track. This was helpful because, previously, the kick drum had been buried underneath all of the other sounds and was difficult to hear, so with a bit of boost on the higher frequencies putting emphasis on the initial part of each kick drum beat, it allowed it to be heard over all of the other synths in the song. The hi-hat got a similar treatment, it received 3 dBs of boost at 10 kHz for the same reason as the kick: to gain clarity in the mix.

The snare, however, was a different case. It had enough of the higher frequencies to stand out in the mastering stage, but it didn’t feel like it had enough impact to be taken seriously, which was why I applied an EQ onto it and boosted some of the lower frequencies, at around 200 Hz. The bass boost helped because it made each strike of the snare sound fatter (“Having more than a normal amount of signal strength at low frequencies or having more sound than normal by use of compression or delay”), which made the snare sounds fit into the already fat feel of the song nicely. In fact, a similar thing was used on the synth that accompanied the main bassline drop synth, making the sound fatter to help add more lower-end frequencies to the mix, supporting the bassline.

That bassline on the drop got the most attention during the mastering stage, as I wanted to have a really rough, hard-hitting riff which made people want to dance to it. To do this, I used a Fuzz-Wah plugin on ProTools to add a lot of fuzz to the synth around the 7 kHz range. This actually boosted the higher frequencies for the use on the fuzz, making the bassline sound clear despite the fact the notes were on the lower frequencies. In addition to this, I used an EQ to boost the frequencies slightly at around 1000 Hz, and the reason for this was to help add some emphasis around those frequencies, creating a thicker sound overall. This was perfect because the combination of these plugins helped to create a wonderful combination of a thick, hard-hitting bassline synth which was also really clear and rhythmic.

The song, prior to the mixing/mastering stage, sounded like this:

The song now sounds like this:
Mixing and Mastering – Wandering Eye Dance Remix

With the sounds selected from the Xpand!2 plugin and the initial sequencing elements done, it was time to mix and master all of the tracks.

Wandering Eye Dance Remix – The volumes, panning and plugins

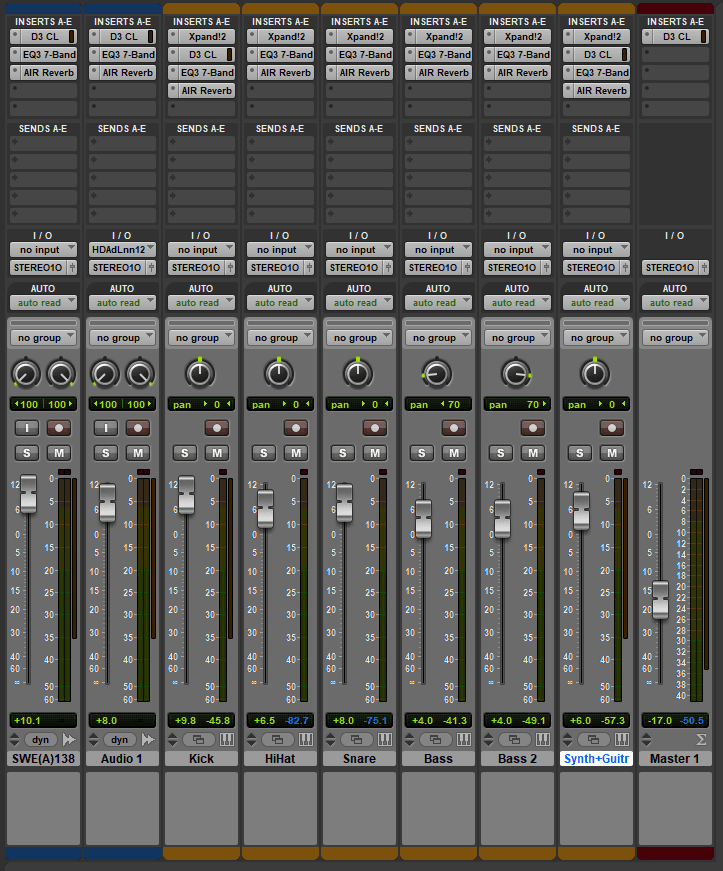
In regards to the mixing for this song, I raised all of the levels across the board to raise the initial volumes of the tracks, before lowering it on the master fader on the right. This was done to make all of the instruments louder initially, balancing the tracks accordingly at that higher volume before lowering the volume of all of them on the master fader, and this was done to make the mixing a little easier to manage for the mastering stage, only needing to raise or lower the master fade if all the tracks needed a volume boost/reduction. In regards to the panning, I panned the bass synths to the left and right, as well as panning the audio on the stereo vocal tracks to the far left and right to give a bigger sense of space on the track, hoping to avoid cluttering the center with too much noise.

In the mastering process, I began with applying a compressor, an equalizer (EQ), and reverb to the vocal tracks, in order to adjust the dynamic range (the compressor) and the frequency levels (the EQ) of the vocals, as well as simulate an environment where the vocals are being sung (the reverb). Initially there had been only one vocal track, but I split it up during the editing process and placed some parts onto the second track (the one called Audio 1). This track was to be the radio effect that had been placed on the vocals during the first verse, which I recreated using the EQ for a part of the second verse I had split from the rest of the song (when the lead singer says “the way I do about you”) as well as at the end of the song when he is talking about ways to stop the female vocalists wandering eye. I did this by lowering all the frequencies in the EQ, except for the frequencies around 2.64 kilohertz (kHz) which I raised, giving the audio a radio-like sound. To improve it, I applied a compressor on some of the higher frequencies prior to applying the EQ, which helped to improve the volume of the track, before applying a small amount of reverb to it to make it fill more of the auditory space.

The compressor and reverb were also used on the main vocal track in the same way, but the way the EQ was used was a little different. Instead of a radio effect, like on the second vocal track, I boosted the frequencies at 5 kHz. This effect helped to make the vocals easier to understand because the increase of the higher frequencies added extra presence to the words that were sung, improving their clarity and helping to stop the vocals from getting lost under all the other instruments.

The hi-hat and snare drums both received boosts at around 4.5 and 5.5 kHz respectively, boosting their higher frequencies to help them sound crisp and clear. Similarly to the vocals, they needed this boost to help them stand out and not be buried underneath the synths because they had too much emphasis on the lower frequencies without the EQ.

I followed this by applying a compressor onto the kick drum, to reduce the dynamic range (“the ratio of the softest sound to the loudest sound”) and boost the volume of the lower frequencies, which I then boosted slightly further with help from the EQ, with some slight reductions from 300 hertz (Hz) to 3 kHz. The intended effect was to give the kick more of a deep ‘boom’ sound, because it helped the kick have more of an impact when coupled with the bass synths. This was also helped by the usage of reverb, because it allowed the sound to become ‘wet’ (where the output sound is affected by the reverb), and, similarly to the vocals, it allowed it to fill more of the empty space in the audio.

The reverb was the same for every single instrument and vocal on this song, as I wanted a consistent sound that wasn’t hindered by one instrument/vocal that didn’t have a reverb, compared to the others that did. On the subject of things being the same, the EQ on both of the bass synths was the same too, adding extra volume to the frequencies around 70 Hz to boost their existence in that range.

The synth-guitar track needed that extra level of presence in the track due to its melodic nature, so I used a compressor to reduce the dynamic range of the sound to boost the lower frequencies to a similar volume level as the higher frequencies, followed by boosting the frequencies at around 3.5 kHz on the EQ to add presence to the track, and then finally the reverb to keep the sound of the synth consistent with the rest of the track. I chose to do all of this because I wanted a loud, harsh guitar-like synth that could stand out on the choruses, but could also help support the vocals when it came to the verses, and I believe the way I mastered the track allowed the synth to perform that role perfectly.

And finally, the master track received a very light compression which slightly reduced the higher frequencies and louder noises from all of the tracks, further helping to get a consistent volume level throughout the song. This was used as a general compression for all of the tracks because I felt that the song had too many opportunities to be too loud or too quiet around the start and end, and I wanted to make sure the volume remained at a constant level despite the changing intensities from the use of velocity on the sounds. This was done because I did not want to have a part in the song that was suddenly louder than the others, which could potentially add unneeded distortion to the song form being too loud, which would be both horrible to listen to and equal to an unprofessional mixing/mastering quality.

The song, prior to the mixing/mastering stage, sounded like this:

The song now sounds like this:
Powered by WordPress & Theme by Anders Norén

Skip to toolbar