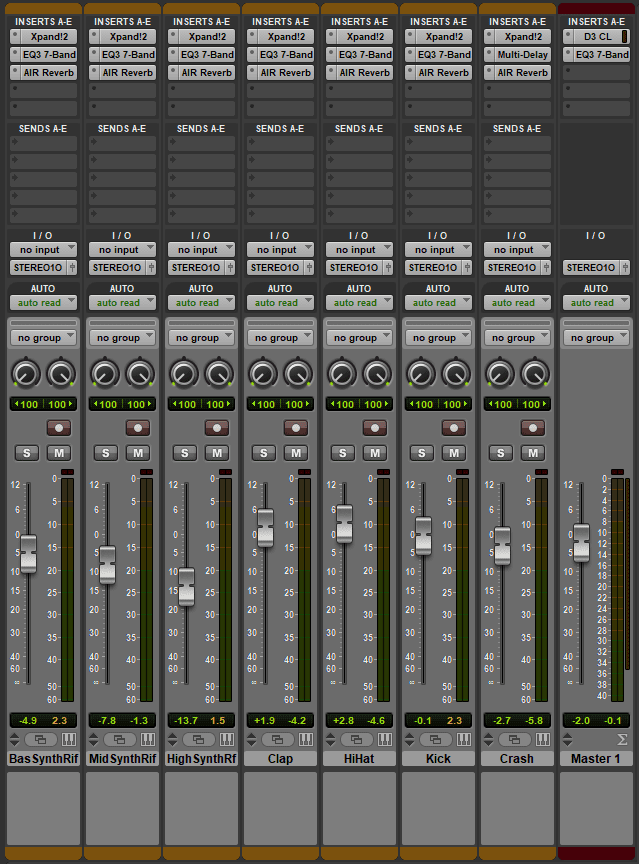
Dropz – The volumes, panning and plugins
While the High Synth track was the melodic riff of the whole song, I felt that it didn’t need as much focus because of the fact that this was a dance track which focused less on the higher pitched melodies and riffs. I wanted the focus to be on the bass synths and the drum kit, which made me lower the volume of the synth riffs more than the others, while the drums remained between 0 and -3 decibels. However, the HiHat and Clap tracks both gained volume as, in the second main section of the song, I felt that they got buried underneath the mix and were hard to hear among the other instruments, so I gave them a volume boost to compensate for this without making them too loud in the rest of the song.
When it came to the mastering for the tracks, I understood that each track needed their own EQ to bring them to a more professional standard of sound, and played to each of the tracks strengths to enhance the overall quality. To do this, I examined each of the tracks and increased frequencies that I felt would improve clarity, while decreasing the frequencies that would make the sounds mesh together into a jumbled mess. For example: For the initial bass riff, I not only increased the bass frequencies under 100 Hz, as well as the frequencies above 2 kHz, but I reduced the upper bass/lower midrange frequencies around 200-400 Hz, to help open up the bass sound slightly and give it some clarity.
In addition, the clap and hi hat tracks received a boost at around 4.5-5 kHz, making the sounds clearer and crisper. This was important because of the heavy usage of the middle and lower frequencies in the song from all of the synths, which could have easily drowned out these two tracks if they had been mastered poorly. But, thanks to the boosting of the higher frequencies, these sounds stood out and were clear enough to not be buried under the barrage of sound from the synths.
Speaking of the synths, the Mid Synth Riff track, the one used for the drop, received a big boost to the frequencies at 200 Hz, which gave the sound a bit more of an “oomph” which helped the song to sound much heavier. Meanwhile, the High Synth Riff got a boost at around 3.5 kHz, allowing it to occupy more of the higher frequencies alongside the hi-hat and claps. The reason for this was because, with all of the other EQs on the other tracks, it muffled the synth and made it impossible to hear in the mix. Thankfully, boosting around these frequencies gave it more clarity and boosted the volume of the notes slightly, which helped it to remain in the mix without being overbearing.
The last instrument to receive the mastering was the kick drum. The original sound for the kick drum felt too hollow, so I applied a gentle boost to the frequencies between 20 and 100 Hz while reducing the other frequencies a little more. This way, I was able to give the kick drum a more ‘boom’ kind of sound (where the lowest bass frequencies are raised to give power to a synth/instrument), which was needed because none of the other drum parts received boosts in that area, and it allowed the kick to have more of an impact on the song, keeping the rhythm audible for the listener.
Each of the instrument tracks also gained a reverb plugin to simulate a small-room environment, which is barely audible on the track but still enough to be noticed on the drops. The reason for this was because I didn’t want to apply a reverb that was too much, and cause the song to be a mess of constant reverb and echo (I didn’t want it to sound like it was recorded in a church or a stadium!), instead opting more for a softer adjustment for a subtle change in the sound.
Finally, I applied a compressor and another EQ onto the master fader to control the dynamic frequency range and remove any unwanted frequencies from the mix. With the compressor, I chose to limit it at a 20.0:1 ratio with a threshold of -5 dBs, which means that any sound louder than -5 dBs would have the compression applied, and the input signal will have to cross the threshold by 20 dBs for the output level to increase by 1dB. Essentially this equated to a gentle limit that reduced the output volume slightly while reducing the frequency range, which was perfect because it reduced any sounds that were too loud and made sure the frequencies I didn’t need around the highest/lowest ends were cut out, or at least reduced, to clean up the track. I used the EQ to remove some of the frequencies below 100 Hz as well, as I wanted to make sure the sound was clear and not cluttered with inaudible frequencies.
The song, prior to the mixing/mastering stage, sounded like this:
The song now sounds like this:
Leave a Reply