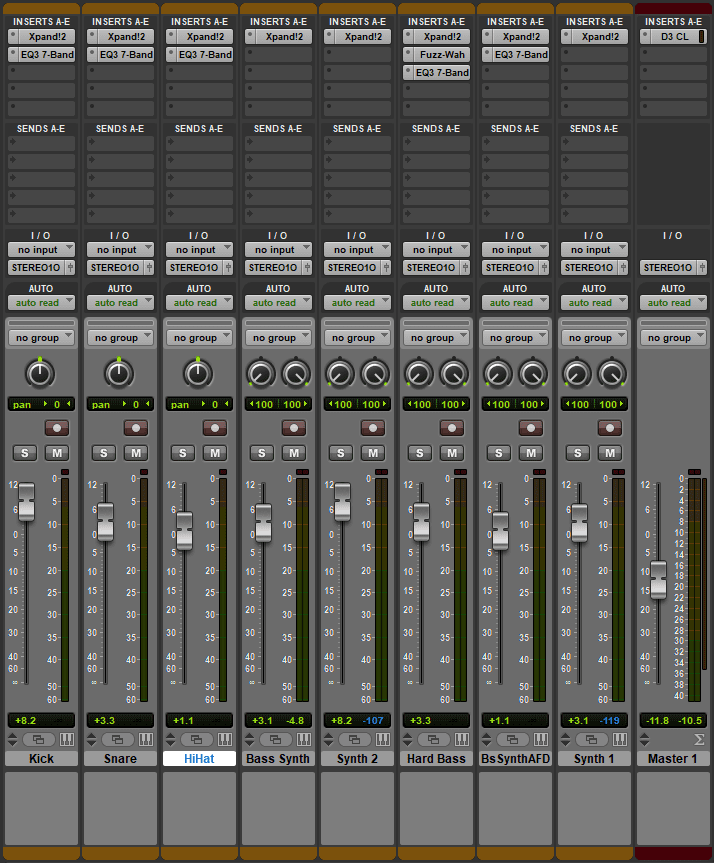
Number 2 – The volumes, panning and plugins
The mixing for Number 2 involved a simple rise to all the volumes of the synths across the board, with the kick drum and “Synth 2” (a lead synth with octave changing notes) receiving the highest boost while the other synths, while also boosted, did not receive as big of a volume boost. The reason this was done was to raise the loudness of the kick drum and synth in particular, but also to make the track as loud as possible without distorting the sound, to allow the drop in the middle of the song to have a bigger impact when it hit, as well as helping the rhythm of the song to be easily heard over the other instruments.
It also helped when it came to the mastering stage because I used a compressor on the master track to reduce the dynamic range slightly across all the tracks, which allowed the lower frequency sounds to increase in volume a little further. This was done to give the bass sounds, as well as the kick, a more ‘full’ timbre, so the sound felt much bigger than it was before and kept the emphasis upon them instead of the higher frequency synths, which were less important to keeping the rhythm.
The EQ I added on the kick drum gave it a much needed boost in the higher frequencies. At 4kHz, I added 6 dBs of gain to the EQ, which helped to give the kick drum some clarity underneath the rest of the track. This was helpful because, previously, the kick drum had been buried underneath all of the other sounds and was difficult to hear, so with a bit of boost on the higher frequencies putting emphasis on the initial part of each kick drum beat, it allowed it to be heard over all of the other synths in the song. The hi-hat got a similar treatment, it received 3 dBs of boost at 10 kHz for the same reason as the kick: to gain clarity in the mix.
The snare, however, was a different case. It had enough of the higher frequencies to stand out in the mastering stage, but it didn’t feel like it had enough impact to be taken seriously, which was why I applied an EQ onto it and boosted some of the lower frequencies, at around 200 Hz. The bass boost helped because it made each strike of the snare sound fatter (“Having more than a normal amount of signal strength at low frequencies or having more sound than normal by use of compression or delay”), which made the snare sounds fit into the already fat feel of the song nicely. In fact, a similar thing was used on the synth that accompanied the main bassline drop synth, making the sound fatter to help add more lower-end frequencies to the mix, supporting the bassline.
That bassline on the drop got the most attention during the mastering stage, as I wanted to have a really rough, hard-hitting riff which made people want to dance to it. To do this, I used a Fuzz-Wah plugin on ProTools to add a lot of fuzz to the synth around the 7 kHz range. This actually boosted the higher frequencies for the use on the fuzz, making the bassline sound clear despite the fact the notes were on the lower frequencies. In addition to this, I used an EQ to boost the frequencies slightly at around 1000 Hz, and the reason for this was to help add some emphasis around those frequencies, creating a thicker sound overall. This was perfect because the combination of these plugins helped to create a wonderful combination of a thick, hard-hitting bassline synth which was also really clear and rhythmic.
The song, prior to the mixing/mastering stage, sounded like this:
The song now sounds like this:
Leave a Reply